Rabu, 09 Juli 2014

Cara Mengetahui Mikrotik Default Password

Mikrotik Default Password adalah password asli (default) dari Mikrotik RouterOS yang ada saat anda baru membeli Mikrotik atau setelah melakukan reset pada Mikrotik. Jika anda membeli Mikrotik baru, maka untuk bisa login ke sistem RouterOS nya baik via Winbox atau lainnya harus menggunakan Mikrotik Default Password (Baca : Belajar Mikrotik : Cara Akses Mikrotik).

Hal yang sama juga berlaku setelah anda melakukan Reset pada Mikrotik, karena setelah melakukan Reset Mikrotik maka semua setingan akan kembali ke Mikrotik Default Settings. (Baca : Tutorial Cara Reset Mikrotik)

Dalam Mikrotik Default Settings terdapat Mikrotik Default Username dan Mikrotik Default Password yang diperlukan untuk login. Nah, maka dari itu sangat penting bagi kita untuk mengetahuinya.  Karena jika tidak tahu setingan default mikrotik nya maka kita tidak bisa mengkonfigurasi Mikrotik tersebut.

Setiap perangkat Mikrotik yang benar-benar belum di otak-atik memiliki Setingan Default sebagai berikut:

IP Address Default Mikrotik :
192.168.88.1/24 pada port ether1
 
Mikrotik Default Username :
admin

Mikrotik Default Password :
(kosong/tanpa password) 

Jadi jika mau login ke Mikrotik via Winbox contoh nya seperti ini :


Itulah Setingan default Mikrotik berupa Mikrotik Default IP Address, Mikrotik Default Password dan Mikrotik Default Username. Perlu anda catat, setelah bisa login dengan menggunakan setingan default Mikrotik tersebut, pastikan anda ganti default username dan default password nya. Caranya silakan lihat disini : Konfigurasi User dan Username Router Mikrotik.
Semoga artikel ini bermanfaat :)
Read more

Selasa, 08 Juli 2014

Scary Blogger Template


Hello Readers! Today I am going to share another blogger template named Scary Blogger Template.IT is designed by facebookvsyoutube.com ..

About Scary Blogger Template:-

Scary is a blogger template that is simple looking, dark background with attractive and cool design and a perfect for a scary look with different animation pictures. If you are opting to create a scary site in blogger then this theme will make your site more interesting. 

Live Demo: Click HERE

Download(MediaFire):-
Read more

Senin, 07 Juli 2014

h4x0r (Hacker) Blogger Template


In my previous posts i have posted some blogger template for hackers or hacking sites Im again here with one more template called h4x0r(Hacker) blogger template.

Live Demo:-Click here

Download(MediaFire):-
Read more

VB (Vio b374k) blogger Template (Clone of b374k Shell)


Hello Readers! Im here again with another blogger template named VB (Vio b374k) blogger Template. Which Exactly looks like b374k Shell [ Download b374k 2.7 Shell ]. It maybe useful for hackers. In my previous posts I have shared some templates like viow0rm - Dark Green Blogger Template,  inj3ct0r1337day Clone Blogger Template: Viorenza World..

Live Demo: Click Here

Download(MediaFire):-

Some Updates:-

1). Find the following code:-
<style type='text/css'>
<b:if cond='data:blog.pageType != "item"'>
<b:if cond='data:blog.pageType != "static_page"'>
. Post-body,. Post-footer {display: none;}
</ B: if>
</ B: if>
</ Style> 
And replace it with:-
<style type='text/css'>
<b:if cond='data:blog.pageType != "item"'>
<b:if cond='data:blog.pageType != "static_page"'>
. Post-body,. Post-footer,. jump-link {display: none;}
</ B: if>
</ B: if>
</ Style>
Note:- jump-link is not added in uploaded template. Just add it. It will display half post with Read More on the Home page ...
Read more

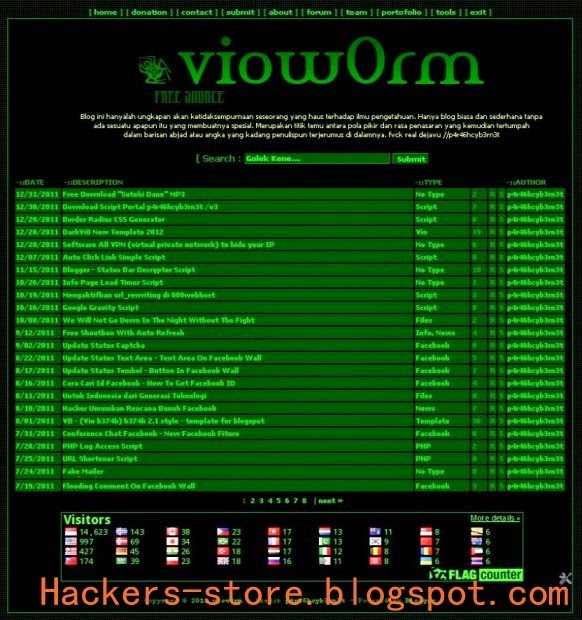
viow0rm - Dark Green Blogger Template


Hello Readers! In my previous post i have shared inj3ct0r 1337day Clone Blogger Template: Viorenza World. Now As i promised that i will share some blogger templates for hackers im here with another template named viow0rm - Dark Green Blogger Template. Actually its similar to inj3ct0r 1337day Clone Blogger Template: Viorenza World. In fact its a version of it.


Download(MediaFire):-

Modifications:-
There are some modification that has to be done in order to get better results:- 

1). Go to Settings then Language And Formatting then in that under Formatting Timestamp Format
should be like this 7/07/2014


2). In column DESCRIPTIONTYPE and AUTHOR number of characters is limited. So please try adjust because if just one character exceeds the column width then it will ruin the look of the blog.

3). The menu is the same template as the previous template here we are using the default widget blogger ie Linklist. Because it is more simple, so there is no need of go to Edit HTML and to add or delete menu navigation. 

4). Do not use the Page List Gadget on this template. Because the post-body area will not be visible. Unless doing his own changes to the CSS. 
Read more

Minggu, 06 Juli 2014

How to Create a Invisible Facebook Account Name


Hello Readers! today Im going to teach you how you guyz can make a Blank Facebook Account or ID. Or how to make a Ghost Facebook Account . So here you go :-

PS:- Its not nameless or blank or Invisibly or Ghost name, actually Its  ï±žï±žï±žï±žï±žï±žï±žï±žï±žï±žï±žï±ž  Symbol ..

Follow the Instructions:-

1). First of all open Google Chrome..

2). Now we need an Indonesian Proxy. So for this go to hidemyass.com scroll down and select Indonesia in country list in order to get proxies of Indonesia... Now click on Update results..


Now it will display list of all Indonesian Proxies...

3). Click on Settings then Show Advanced Settings then under Network click on Change Proxy Settings. Now a dialog Box will appear click on LAN Settings and finally under Proxy Server tick the check box saying "Use a Proxy Server for your LAN(These Settings will not apply to Dial-up or VPN Connections)".

4). Now Enter or paste your Proxy in Address Text Box and paste your port and click OK


5). Now Login to your Facebook account Navigate to your Account Settings..

6). Scroll down and change the language from English (US) to Bahasa Indonesia. And click on Save Changes..


7). Change your name to:-
RﱞﱞﱞﱞﱞﱞﱞﱞﱞﱞﱞﱞM
 (you need to copy this code from here and paste it.)

8). Now Remove the Letter R and M then enter your password and click to Save.And you are done ..!

Thats it..! Enjoy..!!
__________________________________________________________________________

Tags:-

How to make a Facebook account without name
How to make or create a blank facebook account Name
How to make or create a nameless facebook account Name
How to create a ghost facebook account Name
How to create a empty facebook account Name
How to create a invisible facebook account Name
How to create a blank facebook account Name
How to create a Empty Invisibly Facebook Profile or Account Name
How to Hide Facebook Name Invisible 2014
Read more

Any Keylogger for Mac OS X


Any Keylogger for Mac OS X, as one of simple but effective keylogger for Mac OS X, can log all activities on Mac and able to send the logs to email address to help you remotely master your computer's activities. 

Any Keylogger for Mac has 6 major feature which is basic but enough to monitor your Mac's activities.
Besides, Any Keylogger for Mac run stealthily on the background of the Mac so that other people who can access the computer can't randomly change the settings of the software or even close the software.

With simple interface and effective monitoring features, Any Keylogger for Mac has won a number of Mac users and awards. Any Keylogger for Mac is a good solution to Mac activity monitoring.

Any Keylogger is also available for Windows :- Click here

Download AnyKeylogger for Mac:-

Some Key Features:-


 Visit AnyKeylogger For Mac:-
Read more

Rabu, 02 Juli 2014

Cara Mengkoneksikan Mikrotik ke Internet

Bagaimana cara mengkoneksikan Mikrotik ke Internet? Mungkin pertanyaan ini pernah muncul ketika anda baru menggunakan Mikrotik. Ada beberapa cara yang dapat ditempuh untuk mengkoneksikan Mikrotik ke Internet. Cara-cara tersebut bergantung pada modem atau perangkat yang digunakan untuk terkoneksi dengan internet.

Secara umum cara mengkoneksikan Mikrotik ke Internet adalah sebagai berikut :

1. Pastikan dulu sumber koneksi internet. Apakah dari modem ADSL (misalnya Speedy) atau dari modem USB.

2. Jika anda menggunakan Modem USB untuk koneksi ke Internet, silakan baca artikel disini.

3. Jika sumber koneksi internet menggunakan Speedy yang menggunakan PPPoE, maka seting Mikrotik silakan baca disini.

4. Jika sumber koneksi Internet langsung tanpa seting modem dulu, seperti koneksi dari modem Speedy atau Router 3G, dimana tidak perlu tambahan seting di Mikrotik maka lanjut ke step ke 5.

5. Login ke Mikrotik via Winbox --> Masuk ke menu  IP --> DHCP Client --> Tambahkan DHCP Client dengan meng-klik menu +
- Interface : Pilih interface yang terhubung ke sumber Internet
- Use Peer DNS : Centang
- Use Peer NTP : Centang
- Add Default Route : yes


6. Setting IP address. Masuk ke menu IP --> Addresses --> Tambahkan IP address untuk interface yang menuju ke client. Disini saya contohkan memberi IP address pada interface LAN yang menuju ke Client dengan IP address 10.10.10.10/24.
Interface NAT sudah mendapatkan IP address secara otomatis karena sebagai DHCP Client dari sumber internet.


7.  Tambahkan setingan DNS Server. Masuk ke menu IP --> DNS. Karena pada step 5 kita sudah mengguakan DHCP Client dimana kolom "Use Peer DNS" dicentang, maka Mikrotik juga sudah dapat DNS Server secara otomatis dari sumber internet. 
Tapi untuk cadangan bisa tambahkan lagi pakai DNS nya Google : 8.8.8.8


8. Tambahkan setingan NAT Masquerade. Masuk ke menu IP --> Firewall --> Masuk Tab NAT --> Tambahkan rule NAT :
~ Tab General
- Chain : srcnat
- Out-interface : pilih interface yang menuju ke sumber internet
~ Tab Action
- Action : Masquerade


9. Sampai disini, Mikrotik seharusnya sudah konek ke internet. Cek koneksi dengan melakukan ping via terminal.


Demikianlah tutorial cara mengkoneksikan Mikrotik ke Internet. Ini adalah tutorial Mikrotik Dasar yang dapat anda terapkan dan silakan anda kembangkan sendiri selanjutnya.
Read more