Senin, 30 Juni 2014

Google Started Domain Resigtration Service

Hello Readers! today i will tell you about google Domain what is it and what are its features. I know you may already have heard about it. So read it :-

Google Domains:-

Google has just launched a small private beta for a domain registration service “Google Domains.” You can visit their landing page for Registration of a domain for yourself. Visit clicking here.

Google publicly announced plans to get into the domain registration market. Till now the domain market Giants were Godaddy, Namecheap, Network Solutions etc.

Google is still developing its Domain registration service project which is in Beta now. It requires the Invitation if you want to buy a domain from Google.

Features of Google Domain:

1). Free private registration, allowing you to gide your personal details from whois search. like name, address, etc. Without paying anything to third party.
2). Free email forwarding from yourid@yourdomain.com, to your personal Mail inbox
3). Free domain forwarding
4). With Support for up to 100 sub-domains
5). Will support all new upcoming domains, Like .guru, .club, etc.
Support:
Google is promising full phone support for Google Domain customers. Only other one we are aware of is Google Glass. But you know how many people are going to call them, because they are unable to login into their Gmail Account? Haha, thats really funny, cause they are having a absolutely large number of customers.

Get Invite Code: 
Google domains is in beta now. But you can buy if you have invitation. For invitation, go to Google Domains, click the “Manage my domains” button, log in, then hit the “Request an invite" (or you can click on our link.) button. Google isn’t making any promises on how many people they’ll let in, but whats there to give it a try.

Read more

Watch Cyber Attacks And Cyber War Between countries in Real Time


In this modern scenario ,with time technology is also getting advanced. Now you can watch a real time cyber attacks on a world geographic map shows you global hacking attempts in real time. This Awesome thing iz produced by A Security company and its called Real-Time Map..

This Real-Time Map, maintained and managed by the Norse security company, which shows everything about hacking attacks with information about who is hacking and what attack vectors are being used. The data is sourced from a network of “honeypot” servers maintained by Norse, rather than real-world data from the Pentagon, Google, or other high-profile hacking targets. In hacking a honeypot is a juicy-looking target that acts as a trap. either to gather important data about the would-be assailants, or to draw them away from the real target. The Norse website has some info about its "Honeypot." but it’s understandably quite sparse on actual technical details.

If you can see the map for little while, you'll come to know that most of the cyber war activity is originating either from china or USA.  The map shows both, the target and the origin of attack with a nice graphical map...

Vist Real-Time Map:-

Read more

Minggu, 29 Juni 2014

Cara Memblokir Pencarian Winbox Mikrotik

Winbox Mikrotik dapat mencari/menemukan perangkat Mikrotik yang terhubung dengan jaringan PC/Laptop kita. Dengan fitur Winbox ini kita bisa tau Mac Address, IP Address, Identisa Mikrotik, Versi RouterOS, dan tipe Routerboard nya seperti gambar berikut ini :


Fitur ini tentunya dapat memudahkan kita untuk mengidentifikasi Mikrotik yang terhubung ke jaringan kita. Namun dengan adanya fitur ini juga akan mengurangi keamanan jaringan terutama Mikrotik itu sendiri, karena dapat ditemukan oleh siapa saja yang menggunakan Winbox. Lebih parah lagi kalau orang itu sampai bisa login ke Mikrotik nya dan mengacak-acak konfigurasi di dalamnya. Jangan sampai dehh..

Nah, oleh karena itu akan lebih baik dan aman kalau fitur pencarian Mikrotik di Winbox ini diblokir saja. Sehingga ketika siapa saja membuka winbox dan melakukan pencarian, maka Mikrotik kita tidak akan muncul di pencarian Winbox tersebut.

Oke, langsung saja lanjut ke Cara Memblokir Pencarian Winbox Mikrotik :
1. Download Winbox Mikrotik. Yang udah punya gak usah gak apa2 :D

2. Login Mikrotik via Winbox 

3. Masuk ke menu Tools --> MAC Server --> MAC Ping Server --> Hilangkan centang MAC Ping Server Enabled


4. Masuk ke tab Winbox Interface --> Klik pada "all" --> Klik tanda silang untuk disable


5. Masuk ke menu IP --> Neighbors. Disini interface yang terhubung ke perangkat lain akan muncul.


6. Masuk tab Discovery Interfaces --> Pilih interface mana saja yang akan memblokir pencarian Winbox --> Klik tanda silang.


7. Sekarang coba buka Winbox lagi kemudian coba lakukan pencarian. Mikrotik tidak akan ditemukan oleh Winbox seperti gambar berikut :


NB :
Tutorial ini selain memblokir pencarian winbox juga akan memblokir login via MAC Address Mikrotik. Jadi hanya bisa login di Winbox menggunakan IP Address saja. Kalau masih ingin bisa login via MAC Address, langkah 3 dan 4 di atas bisa dilewati saja.

Oke demikianlah Tutorial Cara Memblokir Pencarian Winbox Mikrotik untuk meningkatkan keamanan Mikrotik. Semoga bermanfaat :)
Read more

Sabtu, 28 Juni 2014

Selamat Menunaikan Ibadah Puasa - 1435 H

Marhaban Ya Ramadhan.. Tak terasa bulan Ramadan kembali datang. Alhamdulillah kita kembali diberi kesempatan untuk bertemu dengan bulan Ramadhan yang penuh berkah ini pada tahun 1435 H.
 
Saya selaku admin dari blog MikrotikIndo.blogspot.com mengucapkan selamat menunaikan ibadah puasa bagi anda yang menjalankannya. Semoga kita bisa memanfaatkan momen ini untuk lebih mendekatkan diri kepada sang pencipta, hingga nantinya bersama-sama kita meraih kemenangan. Amiin :)
 https://blogger.googleusercontent.com/img/b/R29vZ2xl/AVvXsEh_8X8rGLbcNyOQnpgKINyRa1ajEwCzDX-66KbXbS5tMh4RNmngzieeel70Jcq0PMAqNr-ZD2DGMMG_nU_z-6W0yAnBbcveDWCb89mYtP4abEo9swwsfPovS1yje2O1oDYi8TyMYR0WP1U/s1600/Puasa+Ramadhan.jpg
Read more

Senin, 23 Juni 2014

How to Block or Remove Annoying Advertisements on Android


Hello Readers! have you ever felt uncomfortable while playing a game or using a app on your Android Device when some annoying Advertisements blocks you in between and makes you angry. So In this tutorial Im going to teach you How you guys can remove Annoying Advertisements  from your Android Apps or games or browsers .. here we have a simple solution for this problem which will blocks all the advertisements which interprets you while you play or browse.. Its pretty easy.. So here we start..

Follow the Instructions:-

1). Download this .txt file from HERE ..and rename it to "hosts" [without quotes]..
So now you have a .txt file named "hosts" that will block all the advertisements on your Android device..

2). Now what you have to do is to, Transfer this hosts file to your android device. To do this open your file explorer on your android device (use free file explorer like F-explorer) ..

3). Now just copy the hosts file and paste it in the following directory:-
/etc or /system/etc
Note:- If there is already a hosts file present just rename it to hosts.bak (to create backup of older hosts file)..

4). Now just paste the hosts file over there and make sure you have administrator's rights to do this..

5). Now just reboot your device to see this trick working. That's it..

Enjoy..!!

Read more

Kamis, 19 Juni 2014

WHMCS Auto 0day Exploiter 5.2.8 by g00n Team Xploiters

Hello Readers! Today Im going to share a wonderfull toll made by g00n Team Xploiters. Its WHMCS Auto 0day Exploiter 5.2.8 by g00n Team Xploiters [PHP] ...

NOTE: THIS IS ONLY FOR EDUCATION PURPOSES, AND FOR SAFETY PURPOSE. WE ARE NOT RESPONSIBLE ANY HARM DONE BY YOU.

So Here It Is:-

Here is the PHP code of this WHMCS Auto Exploiter (0day) 5.2.8:-
↓↓      ↓↓

Note:- You must save it as WHMCS Auto Exploiter.php


So in this you just have to do is crack the Hashes. In some cases just Google the hash and you will get the password. Then just log in to WHMCS ...

Scanned results will saved in a text file: WMCS-Hashes.txt

Screen Shots:-


Read more

How to Hack A Targeted Server Or A Website


Hello Readers! Today I am going to teach you how you guys can target a server and find a vulnerability and hack into..  How to Hack A Targeted Server Or A Website or How to Inject Shell in a Targeted Server or A website or How to Target a Website Or Server...This is not much easy but I will try to explain...

NOTE: THIS IS ONLY FOR EDUCATION PURPOSES, AND FOR SAFETY PURPOSE. WE ARE NOT RESPONSIBLE ANY HARM DONE BY YOU.

Follow the Instructions:-

1). Get I.P. Address

First step is to get a I.P. address of a Website or a Server which you wanna hack. So for this we have to ping our target. To do this..
  • Go to start
  • Open CMD
  • and type :-
ping www.yourtarget.com

So, now you have Ip Address of your Target..

See the following Image as an Example :-


2). Search for Websites hosted on Targeted Server.

Now our second Step is to search for vulnerabilities in your targeted server or a website..So for this you have to do is:-
ip:[targets I.P server]

Example:- ip:74.145.128.97

Now by doing this will Display all the websites hosted on your targeted server..

3). Search for vulnerabilities..

Now third step is to search for vulnerabilities..So for this you can use normal dorks such as .php?id= for SQL Injection Vulnerable websites or you can also try any other exploit. Example:-
ip:74.145.128.97 .php?id=


Now try to find a injectable hole or vulnerability in And hack into the Server or A website. That's it :)

You can do the same if you have other bugs for joomla and other scripts. This method might be old, but its still works as gold. I hope it helps..

Enjoy..!!
Read more

Selasa, 17 Juni 2014

Cara Membatasi Internet Jam Kantor dengan Mikrotik

Membatasi koneksi internet di kantor terutama pada jam kerja kantor dapat dilakukan dengan menggunakan Mikrotik. Ada beberapa cara yang dapat digunakan untuk membatasi koneksi internet di Kantor dengan Mikrotik. Disini saya akan coba share Cara Membatasi Internet Jam Kantor dengan Mikrotik yang pernah saya pasang di kantor. Topologi nya seperti ini :


Sistem yang saya buat yaitu dengan membatasi akses ke situs-situs sosial media, porno, video streaming, dll pada saat jam kerja (08.00 - 12.00 & 13.30 - 16.00). Untuk detail nya sebagai berikut :

Membatasi akses :
Jam kerja pagi (08.00 – 12.00)

Membuka akses :
Jam istirahat (12.00 – 13.30)

Membatasi akses :
Jam kerja siang (13.30 – 16.00)

Membuka akses :
Jam luar kerja (16.00 – 08.00)
Pembatasan ini dimaksudkan agar karyawan dapat memanfaatkan waktu nya pada saat jam kerja untuk mengerjakan pekerjaan nya bukan untuk hal yang lain.  

Untuk membangun sistem ini, saya menggunakan beberapa tools di Mikroik dan juga bantuan dari DNS external yaitu OpenDNS dan Nawala. Disini saya menggunakan perangkat Mikrotik RB 951Ui-2Hnd yang memiliki port USB sehingga bisa menggunakan modem USB sebagai jalur internet cadangan (untuk failover).
Secara umum konfigurasi yang dilakukan adalah sebagai berikut :

1. Mengatur konfigurasi IP Address untuk jaringan Wi-Fi dan LAN pada mikrotik.
2. Menambahkan konfigurasi NTP (Network Time Protocol) Server untuk sinkronisasi waktu supaya mikrotik dapat berkerja tepat waktu. Ini sangat penting supaya script dapat dieksekusi tepat waktu.  Untuk konfigurasi NTP nya bisa lihat di gambar berikut atau bisa baca di artikel ini : Apa itu NTP? Setting NTP Client di Mikrotik


3. Konfigurasi jaringan internet di Mikrotik. Pastikan koneksi internet sudah jalan di Mikrotik. Untuk memastikannya silakan ping ke Google.com
4. Setting interface wireless mikrotik untuk share koneksi internet melalui Wi-Fi.

5. Menambahkan konfigurasi DNS Server dari OpenDNS dan Nawala sebagai filter dan memblokir konten berbahaya. Tutrorial nya silakan baca disini : Cara Mudah Memblokir Situs-situs Dewasa dengan DNS di Mikrotik


6. OpenDNS dapat digunakan untuk memfilter situs berbahaya dan memblokir akses ke situs tertentu sepeti social media, video streaming, dan lain - lain. Sementara untuk DNS Nawala hanya memblokir akses ke situs berbahaya.
7. OpenDNS digunakan saat jam kerja. DNS Nawala digunakan diluar jam kerja. Pengaturan nya menggunakan Script & Scheduller. Seting inilah yang akan dibahas pada artikel ini.

8. Mengaktifkan fitur Web Proxy untuk mempercepat koneksi internet (cache) dan memonitor konten yang diakses client. Silakan baca tutorial nya disini : Cara Membuat Transparent Proxy Mikrotik
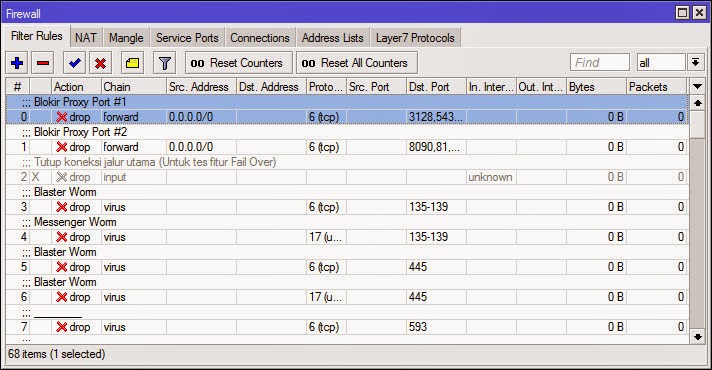
9. Menambahkan konfigurasi firewall mikrotik untuk keamanan. Ada beberapa konfigurasi firewall yang saya gunakan :


10. Menambahkan konfigurasi fail over, untuk menambah jalur akses internet cadangan (backup) menggunakan modem USB dan mengaktifkannya saat koneksi jalur utama mati. Silakan lihat tutorialnya disini :

Oke, kembali ke point nomor 7 di atas, disini saya akan bahas Script & Scheduller nya. Silakan simak step-by-step nya berikut ini :

11. Yang pertama, kita akan membuat Script dulu. Pada Winbox, masuk ke System --> Scripts. Ada beberapa Script yang akan kita buat seperti gambar berikut :


12. Untuk Script back2main dan failover digunakan untuk konfigurasi failover menggunakan jalur cadangan modem USB. Silakan lihat point nomor 10 di atas.

13. Script pertama yang kita buat yaitu script jam kerja. Script ini akan memberikan perintah ke Mikrotik untuk mengganti setingan DNS ke IP DNS nya OpenDNS, kemudian melakukan flush cache DNS. Script nya sebagai beriku (masukkan ke kolom Source)

/ip dns set servers=208.67.220.220,208.67.222.222
/ip dns cache flush

14. Script selanjutnya digunakan untuk mengganti IP DNS ke Nawala.

/ip dns set servers=180.131.144.144,180.131.145.145
/ip dns cache flush

15. Hari libur yaitu Sabtu dan Minggu koneksi internet tidak dibatasi, tetapi masih menggunakan DNS Nawala. Caranya dengan mematikan penjadwalan (Scheduler) yang nanti akan kita buat.

/system scheduler disable 0
/system scheduler disable 1
 

16. Ketika masuk lagi ke hari kerja yakni hari senin, maka aturan nya kembali seperti semula dengan pembatasan internet pada jam kerja. Caranya dengan mengaktifkan kembali scheduler nya.

/system scheduler enable 0
/system scheduler enable 1

17. Script yang sudah kita buat sebelumnya akan dijalankan secara otomatis berdasarkan waktu (jam). Pastikan anda membuat scheduler nya urutan nya sama seperti gambar berikut ini; supaya script pada point 15 dan 16 bisa berjalan.


18.  Buat scheduler untuk mengeksekusi script jam kerja (pagi). 
Name : Filter Jam Kerja Pagi
Start Date : Pilih tanggal kapan script akan mulai dieksekusi secara otomatis
Start Time : Jam berapa script akan dieksekusi
Interval : 1 hari
On Event : nama script yang dieksekusi (jam kerja)

19. Buat scheduler lagi untuk jam kerja sore yakni pukul 13.30 (sesuaikan jam nya dengan jam kantor anda). Lihat gambar berikut :


20. Ketika masuk jam istirahat, pegawai dapat mengakses social media, video streaming, dll kecuali web dan konten porno. Caranya dengan mengganti ke DNS Nawala. Buat scheduler pada jam 12.00 dengan script luar jam kerja (LJK).


21.  Ketika masuk jam pulang kerja, maka koneksi akan sama seperti pada jam istirahat. Disini diasumsikan jam pulang kantor pukul 16.00.


22. Pada hari libur (Sabtu & Minggu) script libur akan dieksekusi secara otomatis pada Jum'at malam pukul 23.59 dengan interval waktu 7 hari. Jadi script ini akan dieksekusi seminggu sekali yakni hari Jum'at malam. 
Jadi, Pastikan Start Date nya adalah hari jum'at


23. Pada hari senin koneksi akan kembali dibatasi secara otomatis dengan script senin yang akan dieksekusi pada senin dini hari pukul 00.00. lebih 50 detik dengan interval 7 hari.
Pastikan start date nya hari senin.


Sampai disini konfigurasi script dan scheduler sudah selesai. Jika setingan nya benar seperti di atas maka script nya akan berjalan dengan baik secara otomatis.

Oke sekian dulu tutorial Cara Membatasi Internet Jam Kantor dengan Mikrotik. Silakan dicoba, semoga berhasil, dan semoga bermanfaat :)
Read more

Minggu, 15 Juni 2014

Get Free Rs.10 Mobile Recharge – Dance India Dance Lil Masters


GET FREE RS10 Recharge. For this you all have to do is just vote for your favorite contestant from Dance India Dance by placing a missed call , the viewer will receive a promo code of freecharge worth Rs 10 ..

Follow the Instructions:-

1).  Give a missed call to the below any one of the Numbers.
  • 18008336001
  • 18008336002
  • 18008336003
  • 18008336004
  • 18008336005
  • 18008336006

2). You will get the Unique code.
3). Use it in Freecharge Android app to Redeem your recharge amount.

Download Here
↓↓      ↓↓


4). After download Enter mobile, Operator and Recharge Amount Rs.10 Only.
5). In next step Check Prom code code Option and Enter your code received thru SMS.
6). Then Click Recharge.
7). Use it and Share with your Friends.

Enjoy..!!
Read more